TAKE TIME TO SIP THE WINE WITH A LIMITED TIME DISCOUNT FOR WINE GLASSES: MORAWINE20
12oz mora ceramics tea mugs with paint, alcohol ink, and cricut machine personalization

6 Creative Ways To Paint & Personalize A Ceramic Mug

6 Creative Ways To Paint & Personalize A Ceramic Mug

APR 5, 2020

6 Creative Ways To Paint & Personalize A Ceramic Mug

There are many reasons why we personalize items. Whatever your reason or urge to be creative stick around for 6 creative ways to paint or personalize your ceramic mug!

The Urge to Get Creative

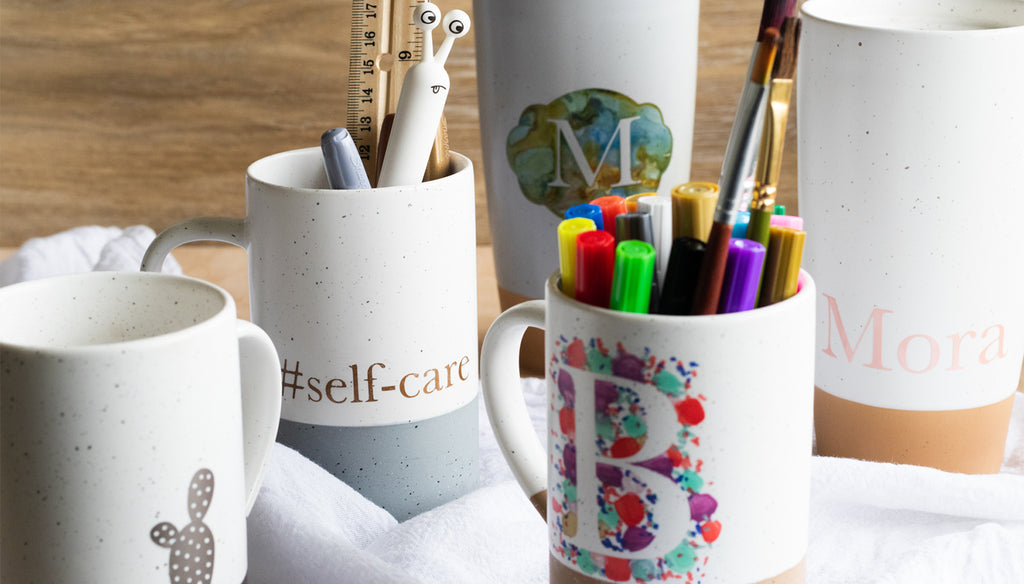
There are many reasons why we personalize items. Perhaps it is a gift and you want it to stand out or be something special for the occasion. Maybe you have a mug sitting around that could use something to spice it up, or you've just received your Mora mug and would love it to have your initial or logo added so that everyone knows that's your mug. Whatever your reason or urge to be creative stick around for 6 creative ways to paint or personalize your ceramic mug.

These six ways to paint or personalize a ceramic mug are relatively convenient, easy to use, and most importantly durable. Yes, some are even dishwasher safe, but not all are microwave safe! So, just keep that in mind if you choose to personalize your microwave/dishwasher safe Mora mug. We'll go over the pros and cons of each one.

Permanent Vinyl- Used with Cricut
Adhesive Foil - Used with Cricut
Sharpie - Oil Based
Acrylic Paint Pen
Paint Markers
Alcohol Ink

I know you're as excited as I am to get started but you may have another question. What materials do I need!

First, we need to pick the method that will best fit our mug decorating needs. Do you have a Cricut machine? Oil based sharpie handy? How about acrylic paint pens, markers, or alcohol ink? I'll add a shopping list of materials for each personalization style. You may have the items you need already stuffed in your craft bin.

Under each section I will add specific steps to each technique, pros and cons of each method, and a shopping list or items you will need. I added links to certain products or stores where I made my purchases, but please purchase the items however convenient for you or use what you already have on hand. These projects are not brand specific, I just wanted to share what I used in case it is helpful to you.

Cricut
Machines

Shopping List

I Have A Cricut!

Some have reached out and asked us what Cricut materials are compatible with our mugs. After much experimentation I have discovered that infusible ink, however amazing the final product looks, is NOT compatible with our mugs. You will need to use a sublimation mug or Cricut mug blank for your ink to transfer successfully. I thought I would just give it a try with one of our tea mugs but it washed right off.

I have had the best success with these two materials:

  1. Permanent Vinyl
  2. Adhesive Foil

I purchased my Cricut materials at my local Michael's store. You can also find material online at Cricut.com or on Amazon. Cricut machines have become ever so popular that you can find the materials even at your local Target or Walmart as well.

Pros & Cons

Here are the Pros:

  • Easy to use
  • Beautiful clean finish
  • Permanent Vinyl survived the dishwasher (however I would recommend hand washing)
  • Still oven safe

Con:

  • May no longer be microwave or dishwasher safe depending on the material you use. (Metal & foil is not microwavable)

Application

  1. Choose your design or upload your design into Cricut design space.
  2. Cut your design on the material according to the Cricut design space instructions.
  3. Weed your vinyl or foil design
  4. Using your vinyl transfer tape carefully place on your mug pressing firm so that there are no air bubbles.
  5. Follow Steps 2 & 9 in the step by step process listed below.
  6. Enjoy your personalized mug.

Acrylic
Paints

Shopping List

A Petro Mora Ceramics tea mug holding Craft Smart paint pens for ceramics and an assortment of acrylic paint markers

Acrylic Paint
or
Oil Based Paint Pen

What kind of paint is the best to use? For this method I found that the Craft Smart permanent paint pens for ceramics had a smooth application. After the dishwasher test, both the acrylic paint design and the craft smart permanent marker with a top coat of Mod Podge were in tact. I plan to hand wash my mugs however just to be safe.

Letter B outlined with colorful acrylic paint splatter
A Mora Ceramics overcast grey travel mug with  Mora in gold lettering using a craft smart paint pen for ceramics

Pros & Cons

Pros:

  • Both Acrylic paint markers/pens and the Craft Smart Paint Pens were easy to apply using a stencil
  • With the Acrylic Paint it was easy to clean up the edge before finishing
  • Dishwasher safe when used with Mod Podge sealer
  • Still oven safe

Cons:

  • The Craft Smart was difficult to clean up on the edges, however it is a very durable paint that will not easily wash off. (You will want to be more careful in the application)
  • Without a top coat sealer no longer dishwasher safe
  • May no longer be microwave safe.

Application

  1. Clean your mug surface with Isopropyl Alcohol
  2. Choose your design, stencil, or trace design with a pencil
  3. Carefully apply your paint, allowing dry time between layers and color changes
  4. Place in the oven, put oven at 350 and bake for about 30 minutes to set the paint, allow to cool completely before handling.
  5. Apply Protective coating if you would like your mug to continue to be dishwasher safe. Allow instructed dry time before use.
A 12 oz flint Mora Ceramics tea mug with #selfcare in bronze sharpie permanent marker

Sharpies

Shopping List

Oil Based Permanent Marker

The old faithful Sharpie. Seems like this marker can do just about anything. I really liked how one of my test subjects turned out. I made a stencil of an M, filled it in with silver metallic sharpie, masked off the mug, and sprayed a coat of Krylon Gloss Clear Lacquer Paint. It gave the paint a water color faded look.

A stenciled M filled in with silver sharpie permanent marker and the edges of the stencil masked with masking tape
Krylon specialty lacquer used to coat the silver M
The final silver M on a nightwaves Mora Ceramics travel mug


Pros & Cons

Pros:

  • Easy to find
  • Affordable
  • Easy to apply
  • Dishwasher safe with a protective seal top coat such as Krylon Lacquer or Mod Podge

Cons:

  • Not as smooth of an application as the Craft Smart paint pen if you want a crisp final look

Application

  1. Prepare your stencil or design
  2. Clean the mug surface with Isopropyl alcohol
  3. Apply your stencil making sure there are no air bubbles on the edges where the paint will flow or sketch your design with a pencil
  4. Apply your sharpie color allowing dry time between layers or color changes
  5. Place in the oven, put oven at 350 and bake for about 30 minutes to set the paint, allow to cool completely before handling.

Alcohol
Ink

Shopping List

The outline of an M on an earl grey mora ceramics travel mug, filled in with alcohol ink in blue, green, and butterscotch colors

Alcohol Ink
MY PERSONAL FAVORITE!

I had such a great turnout with my alcohol ink designs. I must say that this was by far my favorite method for personalizing my Mora mug. The alcohol inks are easy to work with, easy to clean up, and beautiful after they cure.

Pros & Cons

Pros:

  • Easy to use
  • Affordable
  • Easy to clean up
  • Versatile

Cons:

  • I found no cons with this one😜

Application

  1. Prepare your materials and stencil
  2. Clean your mug surface with Isopropyl Alcohol
  3. Apply your stencil and place masking tape around the stencil protecting the mug surface you do not want painted
  4. Spray the soon to be beautified area with IPA
  5. Drop your ink colors and allow them to move and and flow (they tend to run, so you want to be careful where the ink is going)
  6. I used a heat gun to help my ink dry before carefully removing the masking tape and stencil
  7. Clean up the ink runs with alcohol ink on a cotton pad, be sure not to touch your design with the alcohol once it is how you like it
  8. Clean up the finer edges with a small tip paint brush dipped in a little IPA, not too much
  9. Once it is perfect, place in the oven, put oven at 350 and bake for about 30 minutes to set the ink, allow to cool completely before handling.
  10. Apply a protective coating of Mod Podge if you would like your mug to continue to be dishwasher safe. Allow instructed dry time before use.

Tips:

Isopropyl Alcohol in a dropper or spray bottle will help you to flow the ink

Don't use too much IPA and be generous with the alcohol ink

A paint brush with a little IPA helps to clean up fine edges

The letter B stenciled and masked on a seafoam green mora ceramics travel mug

The Process

Many of the preparation steps are the same for the paint, sharpie, and alcohol ink personalization so I listed a basic step by step process below.

Let us know which is your favorite mug personalization method, whether it is one listed here or something totally different! We love creating with you.🥰

Step By Step Process

  1. Prep your stencil, decal, or have an idea in mind. (I love the clean look from a stencil)
  2. Clean your mug surface with IPA and allow to dry completely, this generally takes a couple minutes
  3. If you are adding a decal that you cut from your Cricut machine you can add your decal onto your clean mug surface and skip to step 9
  4. Place your stencil, making sure there are no air bubbles near the edge of the stencil or by the surface you plan to paint. (the metallic paint is difficult to remove if it slips to areas you do not want painted.)
  5. You can sketch your design with a pencil if you do not plan to use a stencil
  6. Follow the application process for the method you chose (listed above)
  7. Clean up the edged and remove any paint or alcohol ink you do not want. For this I use a small paint brush with a little alcohol on it.
  8. Allow to dry
  9. Place in the oven, put oven at 350 and bake for about 30 minutes to set the paint, and allow to cool completely before handling.
  10. Apply Protective coating of Mod Podge if you would like your mug to continue to be dishwasher safe.

I hope you have as much fun creating your own personalized mug as I did! Let me know if you have any suggestions, questions, or if you found these tips helpful!

Written by Beth

CHECK OUT OUR HIT PAUSE GALLERY


Shop the story